Laboratório 08
A documentação desta atividade de laboratório é complementar a documentação principal da disciplina.
Utilize como base a descrição apresentada no Moodle da disciplina.
Conteúdo
Esta atividade de laboratório tem como objetivo configurar a leitura do sensor de temperatura interna e utilizar o SQLite e STM32CubeMonitor. Cada item equivale a 10% da nota.
- Crie um repositório (LAB08) via template (https://github.com/ELT73A-LAB-TPL/LAB08) na organização e clone;
- Importe e compile o código da pasta TEMPSENSOR
- Verifique a configuração dos periféricos;
- Configure o executável e probes no STM32CubeMonitor;
- Deploy e Dashboard no STM32CubeMonitor;
- Configure o SQLite no Node-RED;
- Teste de injeção de dados no SQLite;
- Leitura do ADC e injeção de dados no SQLite;
- Commit e push do Node-RED export flow;
- Envie o link do repositório no GitHub (hyperlink);
Avaliação
- Uso do template e código - 20%
- Configuração do STM32CubeMonitor - 20%
- Configuração e teste do SQLite - 20%
- Leitura do ADC e injeção de dados no SQLite - 20%
- Commit e push do Node-RED export flow - 20%
- Link do repositório no GitHub (hyperlink) - 10%
Verifique o seu ambiente de desenvolvimento
- Git SCM
- GitHub CLI
- VS Code
- STM32CubeIDE
- PlatformIO
Git is the most widely used source-code management tool among professional developers.
- Git is a free and open source distributed version control system designed to handle everything from small to very large projects with speed and efficiency.
winget install --id Git.Git -e --source winget
Configurações do git:
git config --list --show-origin
GitHub CLI brings GitHub to your terminal.
- GitHub CLI is a command line tool that allows you to interact with GitHub from the command line. It is available for Windows, macOS, and Linux.
winget install --id GitHub.cli -e --source winget
Status de login do GitHub CLI:
gh auth status
Visual Studio Code: IDE and Code Editor for Software Development.
- VS Code is a free source-code editor made by Microsoft for Windows, Linux and macOS. It includes support for debugging, embedded Git control, syntax highlighting, intelligent code completion, snippets, and code refactoring.
winget install --id Microsoft.VisualStudioCode -e --source winget
Extensões instaladas do Visual Studio Code para o perfil STM32:
code --list-extensions --profile "STM32"
STM32CubeIDE for Visual Studio Code: development experience for STM32 microcontrollers.
- STM32CubeIDE for Visual Studio Code is designed to enhance the development experience for STM32 microcontrollers by providing a comprehensive and updatable set of tools. The extension pack allow users to install one single pack bringing a full STM32 IDE experience into VS Code.
code --install-extension stmicroelectronics.stm32-vscode-extension --profile "STM32"
PlatformIO IDE for VSCode: Your Gateway to Embedded Software Development Excellence.
- PlatformIO IDE for VSCode Unlock the true potential of embedded software development with PlatformIO’s collaborative ecosystem, embracing declarative principles, test-driven methodologies, and modern toolchains for unrivaled success.
code --install-extension platformio.platformio-ide --profile "STM32IO"
You need to edit the system environment variable called Path and append %USERPROFILE%\.platformio\penv\Scripts\ path in the beginning of the list.
Configure a ferramenta git
Configure o nome de usuário para todos os repositórios locais ligados às suas transações de commit:
git config --global user.name "Your Name"
Configure o email de usuário para todos os repositórios locais ligados às suas transações de commit:
git config --global user.email "you@example.com"
É recomendado verificar se a instalação do seu Git não está realizando nenhuma transformação entre LFs e CRLFs.
git config --global core.autocrlf false
Configure o git para usar o Visual Studio Code como editor padrão para tarefas como escrever mensagens de commit ou rebases interativos
git config --global core.editor "code --wait"
Habilite a coloração automática da saída da linha de comando do Git:
git config --global color.ui auto
Configura o Git para usar main como o nome do branch padrão sempre que você inicializar um novo repositório localmente:
git config --global init.defaultBranch main
Liste as configurações aplicadas:
git config --list --show-origin
- STM32CubeMX
- ST-MCU-FINDER
- STM32CubeProg
- STM32CubeMonitor
STM32CubeMX is an initialization code generator.
- STM32CubeMX is a graphical tool that allows a very easy configuration of STM32 microcontrollers and microprocessors, as well as the generation of the corresponding initialization C code for the Arm® Cortex®-M core or a partial Linux® Device Tree for Arm® Cortex®-A core, through a step-by-step process.
STM32 and STM8 product finder for desktops.
- ST-MCU-FINDER-PC allows exploring and connecting to the complete portfolio of STM32 Arm® Cortex®-M, STM32 Arm® Cortex®-A7, and STM8 microcontrollers, microprocessors, development boards and examples directly from the developer’s desktop environment.
STM32CubeProg is an all-in-one multi-OS software tool for programming STM32 products.
- STM32CubeProg provides an easy-to-use and efficient environment for reading, writing, and verifying device memory through both the debug interface (JTAG and SWD) and the bootloader interface (UART and USB DFU, I2C, SPI, and CAN). STM32CubeProgrammer is delivered in GUI (graphical user interface) and CLI (command-line interface) versions.
STM32CubeMonitor is a Monitoring tool to test STM32 applications at run-time.
- STM32CubeMonitor family of tools helps to fine-tune and diagnose STM32 applications at run-time by reading and visualizing their variables in real-time. With non-intrusive monitoring, STM32CubeMonitor preserves the real-time behavior of applications, and perfectly complements traditional debugging tools to perform application profiling.
Crie um novo repositório com base no template do LAB08
Escolha o Grupo e entre com o comando abaixo para criar o repositório no GitHub:
- A
- B
- C
- D
- E
- F
- G
- H
- I
- J
- K
- L
- X
- Grupo S22-A: https://github.com/ELT73A-S22-2026-2-A
- LAB Template: https://github.com/ELT73A-LAB-TPL/LAB08
Use o comando abaixo para criar o repositório no GitHub com base no template do laboratório LAB08:
gh repo create ELT73A-S22-2026-2-A/LAB08 --private -p ELT73A-LAB-TPL/LAB08 -c
Visualize o repositório:
gh repo view ELT73A-S22-2026-2-A/LAB08 --web
Abra o repositório clonado no VS Code:
code LAB08 --profile "STM32"
- Grupo S22-B: https://github.com/ELT73A-S22-2026-2-B
- LAB Template: https://github.com/ELT73A-LAB-TPL/LAB08
Use o comando abaixo para criar o repositório no GitHub com base no template do laboratório LAB08:
gh repo create ELT73A-S22-2026-2-B/LAB08 --private -p ELT73A-LAB-TPL/LAB08 -c
Visualize o repositório:
gh repo view ELT73A-S22-2026-2-B/LAB08 --web
Abra o repositório clonado no VS Code:
code LAB08 --profile "STM32"
- Grupo S22-C: https://github.com/ELT73A-S22-2026-2-C
- LAB Template: https://github.com/ELT73A-LAB-TPL/LAB08
Use o comando abaixo para criar o repositório no GitHub com base no template do laboratório LAB08:
gh repo create ELT73A-S22-2026-2-C/LAB08 --private -p ELT73A-LAB-TPL/LAB08 -c
Visualize o repositório:
gh repo view ELT73A-S22-2026-2-C/LAB08 --web
Abra o repositório clonado no VS Code:
code LAB08 --profile "STM32"
- Grupo S22-D: https://github.com/ELT73A-S22-2026-2-D
- LAB Template: https://github.com/ELT73A-LAB-TPL/LAB08
Use o comando abaixo para criar o repositório no GitHub com base no template do laboratório LAB08:
gh repo create ELT73A-S22-2026-2-D/LAB08 --private -p ELT73A-LAB-TPL/LAB08 -c
Visualize o repositório:
gh repo view ELT73A-S22-2026-2-D/LAB08 --web
Abra o repositório clonado no VS Code:
code LAB08 --profile "STM32"
- Grupo S22-E: https://github.com/ELT73A-S22-2026-2-E
- LAB Template: https://github.com/ELT73A-LAB-TPL/LAB08
Use o comando abaixo para criar o repositório no GitHub com base no template do laboratório LAB08:
gh repo create ELT73A-S22-2026-2-E/LAB08 --private -p ELT73A-LAB-TPL/LAB08 -c
Visualize o repositório:
gh repo view ELT73A-S22-2026-2-E/LAB08 --web
Abra o repositório clonado no VS Code:
code LAB08 --profile "STM32"
- Grupo S22-F: https://github.com/ELT73A-S22-2026-2-F
- LAB Template: https://github.com/ELT73A-LAB-TPL/LAB08
Use o comando abaixo para criar o repositório no GitHub com base no template do laboratório LAB08:
gh repo create ELT73A-S22-2026-2-F/LAB08 --private -p ELT73A-LAB-TPL/LAB08 -c
Visualize o repositório:
gh repo view ELT73A-S22-2026-2-F/LAB08 --web
Abra o repositório clonado no VS Code:
code LAB08 --profile "STM32"
- Grupo S22-G: https://github.com/ELT73A-S22-2026-2-G
- LAB Template: https://github.com/ELT73A-LAB-TPL/LAB08
Use o comando abaixo para criar o repositório no GitHub com base no template do laboratório LAB08:
gh repo create ELT73A-S22-2026-2-G/LAB08 --private -p ELT73A-LAB-TPL/LAB08 -c
Visualize o repositório:
gh repo view ELT73A-S22-2026-2-G/LAB08 --web
Abra o repositório clonado no VS Code:
code LAB08 --profile "STM32"
- Grupo S22-H: https://github.com/ELT73A-S22-2026-2-H
- LAB Template: https://github.com/ELT73A-LAB-TPL/LAB08
Use o comando abaixo para criar o repositório no GitHub com base no template do laboratório LAB08:
gh repo create ELT73A-S22-2026-2-H/LAB08 --private -p ELT73A-LAB-TPL/LAB08 -c
Visualize o repositório:
gh repo view ELT73A-S22-2026-2-H/LAB08 --web
Abra o repositório clonado no VS Code:
code LAB08 --profile "STM32"
- Grupo S22-I: https://github.com/ELT73A-S22-2026-2-I
- LAB Template: https://github.com/ELT73A-LAB-TPL/LAB08
Use o comando abaixo para criar o repositório no GitHub com base no template do laboratório LAB08:
gh repo create ELT73A-S22-2026-2-I/LAB08 --private -p ELT73A-LAB-TPL/LAB08 -c
Visualize o repositório:
gh repo view ELT73A-S22-2026-2-I/LAB08 --web
Abra o repositório clonado no VS Code:
code LAB08 --profile "STM32"
- Grupo S22-J: https://github.com/ELT73A-S22-2026-2-J
- LAB Template: https://github.com/ELT73A-LAB-TPL/LAB08
Use o comando abaixo para criar o repositório no GitHub com base no template do laboratório LAB08:
gh repo create ELT73A-S22-2026-2-J/LAB08 --private -p ELT73A-LAB-TPL/LAB08 -c
Visualize o repositório:
gh repo view ELT73A-S22-2026-2-J/LAB08 --web
Abra o repositório clonado no VS Code:
code LAB08 --profile "STM32"
- Grupo S22-K: https://github.com/ELT73A-S22-2026-2-K
- LAB Template: https://github.com/ELT73A-LAB-TPL/LAB08
Use o comando abaixo para criar o repositório no GitHub com base no template do laboratório LAB08:
gh repo create ELT73A-S22-2026-2-K/LAB08 --private -p ELT73A-LAB-TPL/LAB08 -c
Visualize o repositório:
gh repo view ELT73A-S22-2026-2-K/LAB08 --web
Abra o repositório clonado no VS Code:
code LAB08 --profile "STM32"
- Grupo S22-L: https://github.com/ELT73A-S22-2026-2-L
- LAB Template: https://github.com/ELT73A-LAB-TPL/LAB08
Use o comando abaixo para criar o repositório no GitHub com base no template do laboratório LAB08:
gh repo create ELT73A-S22-2026-2-L/LAB08 --private -p ELT73A-LAB-TPL/LAB08 -c
Visualize o repositório:
gh repo view ELT73A-S22-2026-2-L/LAB08 --web
Abra o repositório clonado no VS Code:
code LAB08 --profile "STM32"
- Grupo S22-X: https://github.com/ELT73A-S22-2026-2-X
- LAB Template: https://github.com/ELT73A-LAB-TPL/LAB08
Use o comando abaixo para criar o repositório no GitHub com base no template do laboratório LAB08:
gh repo create ELT73A-S22-2026-2-X/LAB08 --private -p ELT73A-LAB-TPL/LAB08 -c
Visualize o repositório:
gh repo view ELT73A-S22-2026-2-X/LAB08 --web
Abra o repositório clonado no VS Code:
code LAB08 --profile "STM32"
Como fazer commit da atualizações
Verifique o status do repositório:
git status
Adicione os arquivos modificados:
git add .
Realize o commit das alterações:
git commit -m "Descrição breve das alterações realizadas!"
Envie para o repositório remoto (GitHub):
git push
Vizualize o log de alterações:
git log
Vizualize no GitHub:
gh repo view --web
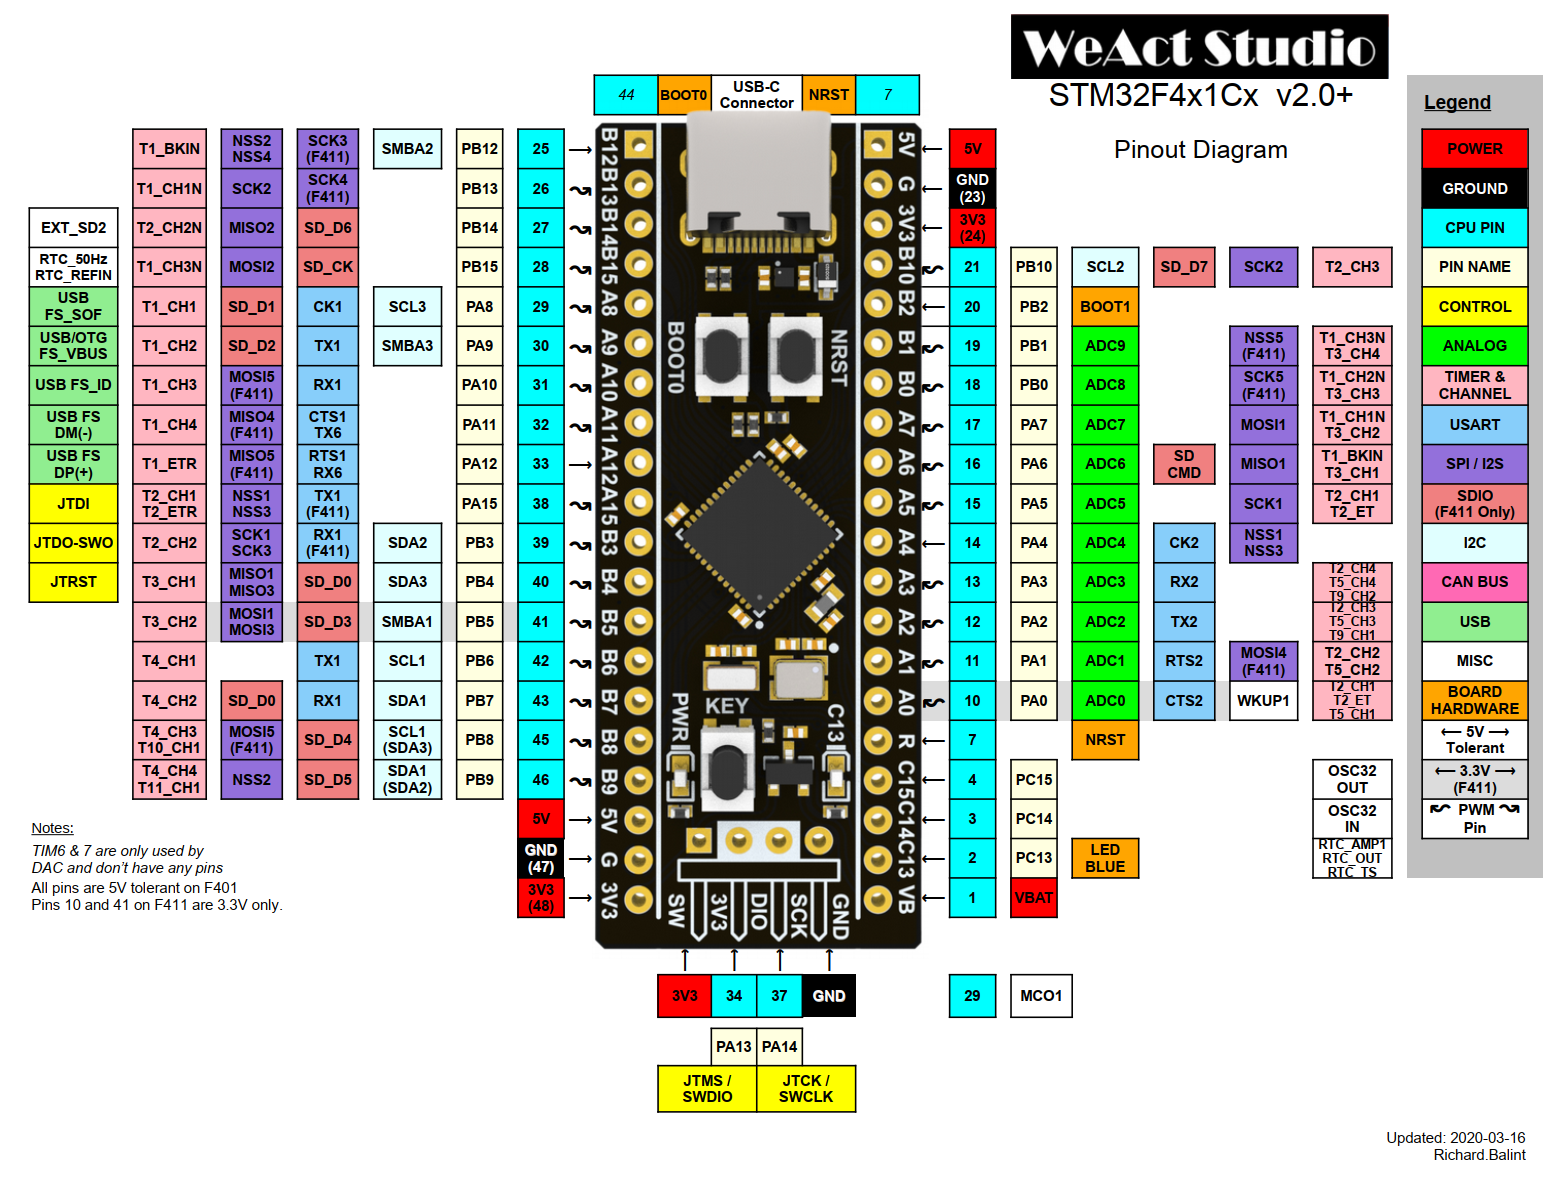
Diagrama de pinos do STM32F4x1
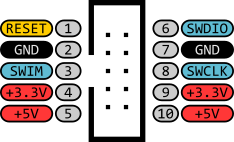
O debugger ST-LINK/V2 possue um conector IDC de 10 pinos. A pinagem é descrita na figura a seguir.
STM32 Internal Temperature Sensor Reading
Seguem algumas referências para leitura do sensor de temperatura interna do STM32F4x1:
- https://deepbluembedded.com/stm32-internal-temperature-sensor-reading-example/
- https://stm32world.com/wiki/STM32_internal_temperature_and_voltage_reference
- https://github.com/lbthomsen/blackpill
Carrege a base do projeto com o LoadMX
LoadMX TEMPSENSOR TEMPSENSOR.txt
Abra o projeto gerado no VS Code:
code TEMPSENSOR --profile="STM32"
Src/main.c
Implemente a lógica para acionar o LED azul via flag BLUELED:
/* USER CODE BEGIN Includes */
#include <stdbool.h>
/* USER CODE END Includes */
/* USER CODE BEGIN PD */
#define AVG_SLOPE   2.5f     // mV/°C
#define V_AT_25C    0.76f    // Volts
#define V_REF_INT   1.21f    // Internal reference voltage
/* USER CODE END PD */
/* USER CODE BEGIN PV */
bool BLUELED = 0;
uint32_t AD_RES_BUFFER[3];
uint16_t ADC1IN1,TEMPSENSOR,VREFINT;
float voltage1,v_ref,v_sense,temp;
/* USER CODE END PV */
Inicialize o Timer 2 com suporte a rotina de interrupção e saída PWM no canal 1:
  /* Initialize all configured peripherals */
  MX_GPIO_Init();
  MX_ADC1_Init();
  MX_TIM2_Init();
  /* USER CODE BEGIN 2 */
  HAL_TIM_PWM_Start_IT(&htim2,TIM_CHANNEL_1);
  /* USER CODE END 2 */
Toggle no LED interno via interrupção do User Key:
/* Infinite loop */
/* USER CODE BEGIN WHILE */
while (1)
{
  // Verify BLUELED Flag
    if (BLUELED)
      HAL_GPIO_WritePin(GPIOC, GPIO_PIN_13, GPIO_PIN_RESET); // LED ON
    else
      HAL_GPIO_WritePin(GPIOC, GPIO_PIN_13, GPIO_PIN_SET); // LED OFF
  /* USER CODE END WHILE */

  /* USER CODE BEGIN 3 */

}
/* USER CODE END 3 */
Src/stm32f4xx_it.c
/* USER CODE BEGIN Includes */
#include <stdbool.h>
/* USER CODE END Includes */
/* USER CODE BEGIN PV */
extern bool BLUELED;
extern uint32_t AD_RES_BUFFER[3];
extern uint16_t ADC1IN1,TEMPSENSOR,VREFINT;
extern float voltage1,v_ref,v_sense,temp;
/* USER CODE END PV */
void EXTI0_IRQHandler(void)
{
  /* USER CODE BEGIN EXTI0_IRQn 0 */
  // Toggle BLUELED FLAG
  BLUELED = !BLUELED;
  /* USER CODE END EXTI0_IRQn 0 */
  HAL_GPIO_EXTI_IRQHandler(User_KEY_EXTI0_Pin);
  /* USER CODE BEGIN EXTI0_IRQn 1 */

  /* USER CODE END EXTI0_IRQn 1 */
}
Inicie o ADC1 na interrupção do Timer 2:
void TIM2_IRQHandler(void)
{
  /* USER CODE BEGIN TIM2_IRQn 0 */

  /* USER CODE END TIM2_IRQn 0 */
  HAL_TIM_IRQHandler(&htim2);
  /* USER CODE BEGIN TIM2_IRQn 1 */
  HAL_ADC_Start_DMA(&hadc1, (uint32_t *)AD_RES_BUFFER, 3);
  /* USER CODE END TIM2_IRQn 1 */
}
HAL_ADC_ConvCpltCallback()é uma função de alto nível fornecida pela ST (STMicroelectronics) para facilitar a vida do desenvolvedor. Ela é chamada automaticamente quando uma conversão ADC é concluída e os dados estão prontos para serem processados. O uso dessa função é recomendado porque ela abstrai a complexidade de lidar diretamente com as interrupções de ADC e o gerenciamento de buffers, permitindo que o desenvolvedor se concentre na lógica de aplicação em vez de detalhes de baixo nível.
/* USER CODE BEGIN 1 */
void HAL_ADC_ConvCpltCallback(ADC_HandleTypeDef* hadc)
{
  // Conversion Complete & DMA Transfer Complete As Well
  ADC1IN1 = AD_RES_BUFFER[0];
  TEMPSENSOR = AD_RES_BUFFER[1];
  VREFINT = AD_RES_BUFFER[2];
  voltage1 = (ADC1IN1 * 3.3) / 4095;
  // 1. Calculate the actual VREF (VDDA)
  // This compensates for power supply fluctuations
  v_ref = (V_REF_INT * 4095.0f) / (float)VREFINT;

  // 2. Convert raw temperature sensor value to voltage
  v_sense = ((float)TEMPSENSOR * v_ref) / 4095.0f;

  // 3. Final Temperature in Celsius
  // Note: Some datasheets use (V_sense - V_25) / Slope + 25.
  // Check your specific RM; usually, if Slope is positive, it's (V_sense - V_at_25).
  temp = ((v_sense - V_AT_25C) * 1000.0f / AVG_SLOPE) + 25.0f;
  TIM2->CCR1 = ADC1IN1;  // PWM CH1 duty cycle update based on ADC1IN1
}
/* USER CODE END 1 */
SQLite
- https://sqlite.org/
- https://inloop.github.io/sqlite-viewer/
- https://flows.nodered.org/node/node-red-node-sqlite
Formato de dados para injeção no SQLite:
{
  "payload": {
    "ADC1IN1": 1769,
    "BLUELED": 0,
    "temp": 18.937469482421875,
    "TEMPSENSOR": 1004,
    "v_ref": 3.037982940673828,
    "v_sense": 0.7448436617851257,
    "voltage1": 1.4255677461624146,
    "VREFINT": 1631
  },
  "topic": "data"
}
Template para a criação da tabela de dados do sensor:
CREATE TABLE IF NOT EXISTS sensor_data (
    id INTEGER PRIMARY KEY AUTOINCREMENT,
    timestamp DATETIME DEFAULT CURRENT_TIMESTAMP,
    ADC1IN1 INTEGER,
    BLUELED INTEGER,
    TEMPSENSOR INTEGER,
    VREFINT INTEGER,
    voltage1 REAL,
    v_ref REAL,
    v_sense REAL,
    temp REAL
);
Código para injeção de dados simulados no SQLite:
// Define the missing calibration constants (Typical STM32 values)
const V_AT_25C = 0.76; // Volts at 25°C
const AVG_SLOPE = 2.5; // mV/°C

// Generate mock data
let ADC1IN1 = Math.floor(Math.random() * 4096);
let BLUELED = Math.round(Math.random());
let voltage1 = (ADC1IN1 * 3.3) / 4095;
let TEMPSENSOR = Math.floor(Math.random() * 1000) + 500;

let v_ref = (1.21 * 4095) / (Math.floor(Math.random() * 1000) + 1000);
let v_sense = (TEMPSENSOR * v_ref) / 4095;

// FIXED: Removed the 'f' suffixes from 1000.0 and 25.0
let temp = ((v_sense - V_AT_25C) * 1000.0) / AVG_SLOPE + 25.0;
let VREFINT = Math.floor(Math.random() * 1000) + 1000;

// Format the decimals safely before sending to SQL
voltage1 = Number(voltage1.toFixed(2));
v_ref = Number(v_ref.toFixed(2));
v_sense = Number(v_sense.toFixed(2));
temp = Number(temp.toFixed(2));

// Prepare the SQL query statement
// Replace 'sensor_data' with your actual table name
msg.topic = `INSERT INTO sensor_data (ADC1IN1, voltage1, BLUELED, TEMPSENSOR, v_ref, v_sense, temp, VREFINT)
             VALUES (${ADC1IN1}, ${voltage1}, ${BLUELED}, ${TEMPSENSOR}, ${v_ref}, ${v_sense}, ${temp}, ${VREFINT});`;

return msg;
Função para a leitura de dados via aquisição com STLINK e injeção no SQLite:
// Navigate the nested structure
const data = msg.payload.variabledata[0].y;

// Construct the SQL query with the 8 variables
// We include the 'x' value as our timestamp

msg.topic = `INSERT INTO sensor_data (ADC1IN1, voltage1, BLUELED, TEMPSENSOR, v_ref, v_sense, temp, VREFINT)
VALUES (
                ${data.ADC1IN1},
                ${data.voltage1.toFixed(2)},
                ${data.BLUELED},
                ${data.TEMPSENSOR},
                ${data.v_ref.toFixed(2)},
                ${data.v_sense.toFixed(2)},
                ${data.temp.toFixed(2)},
                ${data.VREFINT}
             );`;
// Clear payload to trigger the SQLite node
msg.payload = [];

return msg;
Versão simplificada sem as colunas de cálculos de tensão:
// Navigate the nested structure
const data = msg.payload.variabledata[0].y;

// Construct the SQL query with the 8 variables
// We include the 'x' value as our timestamp

msg.topic = `INSERT INTO sensor_data (ADC1IN1, BLUELED, TEMPSENSOR, VREFINT)
VALUES (
                ${data.ADC1IN1},
                ${data.BLUELED},
                ${data.TEMPSENSOR},
                ${data.VREFINT}
             );`;
// Clear payload to trigger the SQLite node
msg.payload = [];

return msg;
The SQL Query
SELECT * FROM sensor_data ORDER BY timestamp DESC LIMIT 1;
SQLite always returns data as an Array of Objects, even if there is only one result.
// Check if data actually exists to avoid errors
if (msg.payload.length > 0) {
  // Take the first element of the array
  // msg.payload = msg.payload[0];
  msg.payload = msg.payload[0].voltage1;
  return msg;
}
SQLite to insert data into the database
Calculation Node (Function after the SQLite node):
msg.topic = "SELECT ADC1IN1 FROM sensor_data ORDER BY id DESC LIMIT 1;";
return msg;
if (msg.payload.length > 0) {
  let adc_1 = msg.payload[0].ADC1IN1;

  // Perform the conversion
  let voltage1 = (adc_1 * 3.3) / 4095;

  // Return the result rounded to 2 decimal places
  msg.payload = voltage1.toFixed(2);

  return msg;
}
Or:
// The math: (adc1 * 3.3) / 4095
msg.topic =
  "SELECT (ADC1IN1 * 3.3 / 4095) AS voltage1 FROM sensor_data ORDER BY id DESC LIMIT 1;";
return msg;
Average of the Last "X" Records
msg.topic = `SELECT AVG(ADC1IN1) AS mean_adc1
             FROM (SELECT ADC1IN1 FROM sensor_data ORDER BY id DESC LIMIT 5);`;
return msg;
Como calcular a temperatura diretamente no SQL usando os dados brutos do sensor:
SELECT Round(( (
               -- Step 2: v_sense calculation using the derived v_ref
               ( TEMPSENSOR * ( ( 1.21 * 4095.0 ) / VREFINT ) ) / 4095.0
               -- Step 3: Temperature conversion formula
               - 0.76 ) * 1000.0 / 2.5 ) + 25.0, 2) AS calculated_temp
FROM   sensor_data_full
ORDER  BY id DESC
LIMIT  1;
SELECT
    ROUND(
        ((((TEMPSENSOR * 1.21 / VREFINT) - 0.76) * 1000.0 / 2.5) + 25.0),
        2
    ) AS optimized_temp
FROM sensor_data
ORDER BY id DESC
LIMIT 1;
VS Code Terminal Configuration
Configure Git Bash como terminal integrado do Visual Studio Code para evitar problemas de formatação de texto e comandos:
"terminal.integrated.defaultProfile.windows": "Git Bash",
Crie um gh alias para deploy-debug
gh alias set deploy-debug 'tag="$1"; cp ./build/Debug/*.elf ./firmware-debug.elf && gh release create "$tag" ./firmware-debug.elf --generate-notes && rm ./firmware-debug.elf' --shell
Como funciona:
- Considera a etiqueta de lançamento como $1.
- Copia o ELF de ./build/Debug/*.elf → ./firmware-debug.elf.
- Executa gh release create com o arquivo renomeado.
- Limpa removendo o arquivo renomeado temporário.
Uso:
gh deploy-debug v1.0.0
Rápida verificação do upload
Assim que o comando terminar, você poderá verificar o upload diretamente em seu terminal usando:
gh release view v1.0.0 --web