Laboratório 07
A documentação desta atividade de laboratório é complementar a documentação principal da disciplina.
Utilize como base a descrição apresentada no Moodle da disciplina.
| Tarefa | Template | Início | Fim | Conteúdo |
|---|---|---|---|---|
| LAB07 | TPL07 | 11-May-2026 | 18-May-2026 | ADC com DMA; Uso do STM32CubeMonitor; Manipulação de variáveis; |
Conteúdo
Esta atividade de laboratório tem como objetivo utilizar o DMA, MQTT e STM32CubeMonitor. Cada item equivale a 10% da nota.
- Crie um repositório (LAB07) via template (https://github.com/ELT73A-LAB-TPL/LAB07) na organização e clone;
- Importe e compile o código da pasta TIM2EXTI0ADC1PWMDMA
- Verifique a configuração dos periféricos;
- Configure o executável e probes no STM32CubeMonitor;
- Configure o MQTT no Node-RED;
- Teste de injeção de dados no MQTT;
- Comfiguração do APP para MQTT;
- Acionamento do LED via MQTT;
- Commit e push do Node-RED export flow;
- Envie o link do repositório no GitHub (hyperlink);
Avaliação
- Uso do template e código - 20%
- Configuração do STM32CubeMonitor - 20%
- Configuração e teste do MQTT - 20%
- Comfiguração do APP e acionamento do LED - 20%
- Commit e push do Node-RED export flow - 20%
- Link do repositório no GitHub (hyperlink) - 10%
Verifique o seu ambiente de desenvolvimento
- Git SCM
- GitHub CLI
- VS Code
- Wokwi
- PlatformIO
Git is the most widely used source-code management tool among professional developers.
- Git is a free and open source distributed version control system designed to handle everything from small to very large projects with speed and efficiency.
winget install --id Git.Git -e --source winget
Configurações do git:
git config --list --show-origin
GitHub CLI brings GitHub to your terminal.
- GitHub CLI is a command line tool that allows you to interact with GitHub from the command line. It is available for Windows, macOS, and Linux.
winget install --id GitHub.cli -e --source winget
Status de login do GitHub CLI:
gh auth status
Visual Studio Code: IDE and Code Editor for Software Development.
- VS Code is a free source-code editor made by Microsoft for Windows, Linux and macOS. It includes support for debugging, embedded Git control, syntax highlighting, intelligent code completion, snippets, and code refactoring.
winget install --id Microsoft.VisualStudioCode -e --source winget
Extensões instaladas do Visual Studio Code para o perfil STM32:
code --list-extensions --profile "ESP32IO"
Wokwi for VSCode: Embedded systems and IoT simulator supporting ESP32, Arduino, and the Raspberry Pi Pico.
- Wokwi for VSCode Your code never leaves your computer - Wokwi runs the simulation inside VS Code, using the firmware binaries from your project.
code --install-extension wokwi.wokwi-vscode --profile "ESP32IO"
PlatformIO IDE for VSCode: Your Gateway to Embedded Software Development Excellence.
- PlatformIO IDE for VSCode Unlock the true potential of embedded software development with PlatformIO’s collaborative ecosystem, embracing declarative principles, test-driven methodologies, and modern toolchains for unrivaled success.
code --install-extension platformio.platformio-ide --profile "ESP32IO"
You need to edit the system environment variable called Path and append %USERPROFILE%\.platformio\penv\Scripts\ path in the beginning of the list.
Configure o nome de usuário para todos os repositórios locais ligados às suas transações de commit:
git config --global user.name "Your Name"
Configure o email de usuário para todos os repositórios locais ligados às suas transações de commit:
git config --global user.email "you@example.com"
É recomendado verificar se a instalação do seu Git não está realizando nenhuma transformação entre LFs e CRLFs.
git config --global core.autocrlf false
Configure o git para usar o Visual Studio Code como editor padrão para tarefas como escrever mensagens de commit ou rebases interativos
git config --global core.editor "code --wait"
Habilite a coloração automática da saída da linha de comando do Git:
git config --global color.ui auto
Configura o Git para usar main como o nome do branch padrão sempre que você inicializar um novo repositório localmente:
git config --global init.defaultBranch main
Liste as configurações aplicadas:
git config --list --show-origin
Crie um novo repositório com base no template do LAB07
Escolha o Grupo e entre com o comando abaixo para criar o repositório no GitHub:
- A
- B
- C
- D
- E
- F
- G
- H
- I
- J
- K
- L
- X
- Grupo S22-A: https://github.com/ELT73A-S22-2026-2-A
- LAB Template: https://github.com/ELT73A-LAB-TPL/LAB07
Use o comando abaixo para criar o repositório no GitHub com base no template do laboratório LAB07:
gh repo create ELT73A-S22-2026-2-A/LAB07 --private -p ELT73A-LAB-TPL/LAB07 -c
Visualize o repositório:
gh repo view ELT73A-S22-2026-2-A/LAB07 --web
Abra o repositório clonado no VS Code:
code LAB07 --profile "STM32"
- Grupo S22-B: https://github.com/ELT73A-S22-2026-2-B
- LAB Template: https://github.com/ELT73A-LAB-TPL/LAB07
Use o comando abaixo para criar o repositório no GitHub com base no template do laboratório LAB07:
gh repo create ELT73A-S22-2026-2-B/LAB07 --private -p ELT73A-LAB-TPL/LAB07 -c
Visualize o repositório:
gh repo view ELT73A-S22-2026-2-B/LAB07 --web
Abra o repositório clonado no VS Code:
code LAB07 --profile "STM32"
- Grupo S22-C: https://github.com/ELT73A-S22-2026-2-C
- LAB Template: https://github.com/ELT73A-LAB-TPL/LAB07
Use o comando abaixo para criar o repositório no GitHub com base no template do laboratório LAB07:
gh repo create ELT73A-S22-2026-2-C/LAB07 --private -p ELT73A-LAB-TPL/LAB07 -c
Visualize o repositório:
gh repo view ELT73A-S22-2026-2-C/LAB07 --web
Abra o repositório clonado no VS Code:
code LAB07 --profile "STM32"
- Grupo S22-D: https://github.com/ELT73A-S22-2026-2-D
- LAB Template: https://github.com/ELT73A-LAB-TPL/LAB07
Use o comando abaixo para criar o repositório no GitHub com base no template do laboratório LAB07:
gh repo create ELT73A-S22-2026-2-D/LAB07 --private -p ELT73A-LAB-TPL/LAB07 -c
Visualize o repositório:
gh repo view ELT73A-S22-2026-2-D/LAB07 --web
Abra o repositório clonado no VS Code:
code LAB07 --profile "STM32"
- Grupo S22-E: https://github.com/ELT73A-S22-2026-2-E
- LAB Template: https://github.com/ELT73A-LAB-TPL/LAB07
Use o comando abaixo para criar o repositório no GitHub com base no template do laboratório LAB07:
gh repo create ELT73A-S22-2026-2-E/LAB07 --private -p ELT73A-LAB-TPL/LAB07 -c
Visualize o repositório:
gh repo view ELT73A-S22-2026-2-E/LAB07 --web
Abra o repositório clonado no VS Code:
code LAB07 --profile "STM32"
- Grupo S22-F: https://github.com/ELT73A-S22-2026-2-F
- LAB Template: https://github.com/ELT73A-LAB-TPL/LAB07
Use o comando abaixo para criar o repositório no GitHub com base no template do laboratório LAB07:
gh repo create ELT73A-S22-2026-2-F/LAB07 --private -p ELT73A-LAB-TPL/LAB07 -c
Visualize o repositório:
gh repo view ELT73A-S22-2026-2-F/LAB07 --web
Abra o repositório clonado no VS Code:
code LAB07 --profile "STM32"
- Grupo S22-G: https://github.com/ELT73A-S22-2026-2-G
- LAB Template: https://github.com/ELT73A-LAB-TPL/LAB07
Use o comando abaixo para criar o repositório no GitHub com base no template do laboratório LAB07:
gh repo create ELT73A-S22-2026-2-G/LAB07 --private -p ELT73A-LAB-TPL/LAB07 -c
Visualize o repositório:
gh repo view ELT73A-S22-2026-2-G/LAB07 --web
Abra o repositório clonado no VS Code:
code LAB07 --profile "STM32"
- Grupo S22-H: https://github.com/ELT73A-S22-2026-2-H
- LAB Template: https://github.com/ELT73A-LAB-TPL/LAB07
Use o comando abaixo para criar o repositório no GitHub com base no template do laboratório LAB07:
gh repo create ELT73A-S22-2026-2-H/LAB07 --private -p ELT73A-LAB-TPL/LAB07 -c
Visualize o repositório:
gh repo view ELT73A-S22-2026-2-H/LAB07 --web
Abra o repositório clonado no VS Code:
code LAB07 --profile "STM32"
- Grupo S22-I: https://github.com/ELT73A-S22-2026-2-I
- LAB Template: https://github.com/ELT73A-LAB-TPL/LAB07
Use o comando abaixo para criar o repositório no GitHub com base no template do laboratório LAB07:
gh repo create ELT73A-S22-2026-2-I/LAB07 --private -p ELT73A-LAB-TPL/LAB07 -c
Visualize o repositório:
gh repo view ELT73A-S22-2026-2-I/LAB07 --web
Abra o repositório clonado no VS Code:
code LAB07 --profile "STM32"
- Grupo S22-J: https://github.com/ELT73A-S22-2026-2-J
- LAB Template: https://github.com/ELT73A-LAB-TPL/LAB07
Use o comando abaixo para criar o repositório no GitHub com base no template do laboratório LAB07:
gh repo create ELT73A-S22-2026-2-J/LAB07 --private -p ELT73A-LAB-TPL/LAB07 -c
Visualize o repositório:
gh repo view ELT73A-S22-2026-2-J/LAB07 --web
Abra o repositório clonado no VS Code:
code LAB07 --profile "STM32"
- Grupo S22-K: https://github.com/ELT73A-S22-2026-2-K
- LAB Template: https://github.com/ELT73A-LAB-TPL/LAB07
Use o comando abaixo para criar o repositório no GitHub com base no template do laboratório LAB07:
gh repo create ELT73A-S22-2026-2-K/LAB07 --private -p ELT73A-LAB-TPL/LAB07 -c
Visualize o repositório:
gh repo view ELT73A-S22-2026-2-K/LAB07 --web
Abra o repositório clonado no VS Code:
code LAB07 --profile "STM32"
- Grupo S22-L: https://github.com/ELT73A-S22-2026-2-L
- LAB Template: https://github.com/ELT73A-LAB-TPL/LAB07
Use o comando abaixo para criar o repositório no GitHub com base no template do laboratório LAB07:
gh repo create ELT73A-S22-2026-2-L/LAB07 --private -p ELT73A-LAB-TPL/LAB07 -c
Visualize o repositório:
gh repo view ELT73A-S22-2026-2-L/LAB07 --web
Abra o repositório clonado no VS Code:
code LAB07 --profile "STM32"
- Grupo S22-X: https://github.com/ELT73A-S22-2026-2-X
- LAB Template: https://github.com/ELT73A-LAB-TPL/LAB07
Use o comando abaixo para criar o repositório no GitHub com base no template do laboratório LAB07:
gh repo create ELT73A-S22-2026-2-X/LAB07 --private -p ELT73A-LAB-TPL/LAB07 -c
Visualize o repositório:
gh repo view ELT73A-S22-2026-2-X/LAB07 --web
Abra o repositório clonado no VS Code:
code LAB07 --profile "STM32"
Como fazer commit da atualizações
Verifique o status do repositório:
git status
Adicione os arquivos modificados:
git add .
Realize o commit das alterações:
git commit -m "Descrição breve das alterações realizadas!"
Envie para o repositório remoto (GitHub):
git push
Vizualize o log de alterações:
git log
Vizualize no GitHub:
gh repo view --web
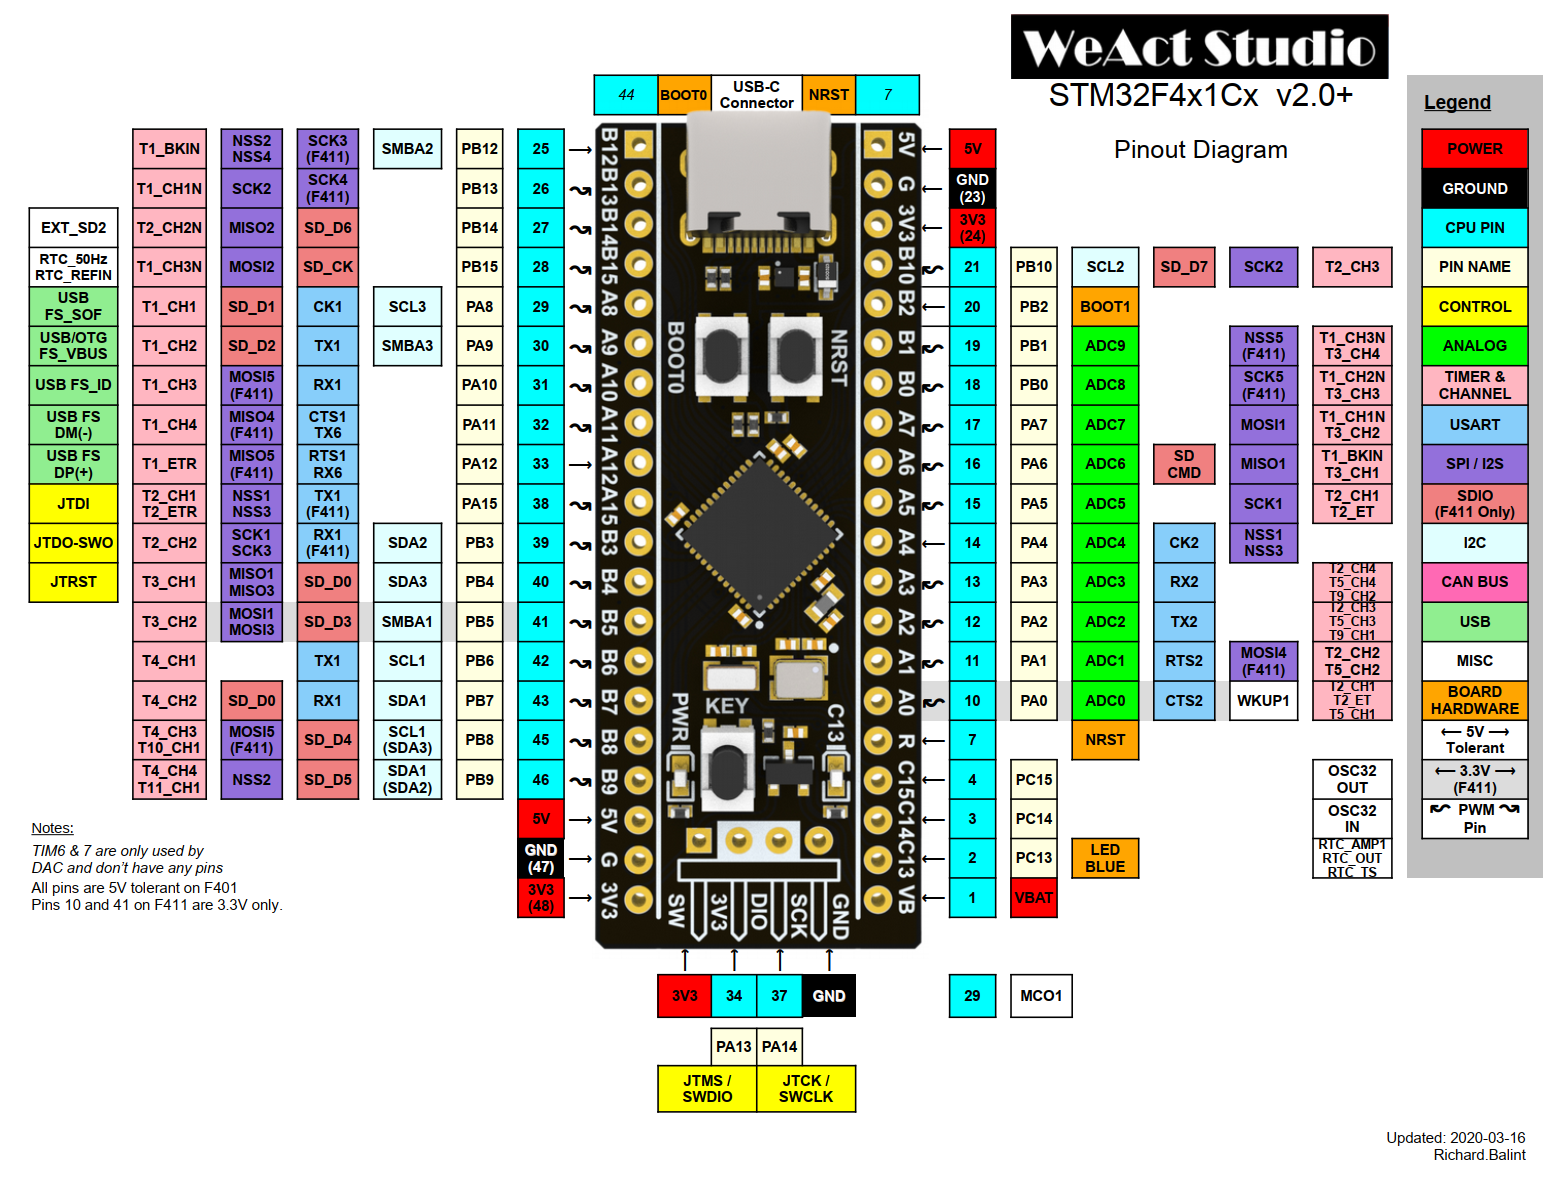
Diagrama de pinos do STM32F4x1
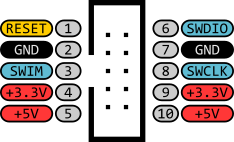
O debugger ST-LINK/V2 possue um conector IDC de 10 pinos. A pinagem é descrita na figura a seguir.
Acesso Direto à Memória
O DMA (Direct Memory Access, ou Acesso Direto à Memória) no microcontrolador STM32F411CEU6 é um periférico projetado para transferir dados em alta velocidade entre memórias e periféricos sem a intervenção da CPU. Isso é especialmente útil para operações que exigem grandes volumes de dados, como leitura de sensores, comunicação serial ou manipulação de buffers de áudio/vídeo, onde a CPU pode ficar sobrecarregada se tiver que gerenciar cada byte de dados. O DMA pode ser configurado para transferir dados de uma fonte (como um periférico ou memória) para um destino (outra memória ou periférico) de forma eficiente, liberando a CPU para realizar outras tarefas enquanto a transferência ocorre em segundo plano.
User Code
Src/main.c
Implemente a lógica para acionar o LED azul via flag BLUELED:
/* USER CODE BEGIN Includes */
#include <stdbool.h>
/* USER CODE END Includes */
/* USER CODE BEGIN PV */
bool BLUELED = 0;
uint32_t AD_RES_BUFFER[2];
uint16_t ADC1IN1,ADC1IN2;
float voltage1,voltage2;
/* USER CODE END PV */
Inicialize o Timer 2 com suporte a rotina de interrupção e saída PWM no canal 1:
  /* Initialize all configured peripherals */
  MX_GPIO_Init();
  MX_ADC1_Init();
  MX_TIM2_Init();
  /* USER CODE BEGIN 2 */
  HAL_TIM_PWM_Start_IT(&htim2,TIM_CHANNEL_1);
  /* USER CODE END 2 */
Toggle no LED interno via interrupção do User Key:
/* Infinite loop */
/* USER CODE BEGIN WHILE */
while (1)
{
  // Verify BLUELED Flag
    if (BLUELED)
      HAL_GPIO_WritePin(GPIOC, GPIO_PIN_13, GPIO_PIN_RESET); // LED ON
    else
      HAL_GPIO_WritePin(GPIOC, GPIO_PIN_13, GPIO_PIN_SET); // LED OFF
  /* USER CODE END WHILE */

  /* USER CODE BEGIN 3 */

}
/* USER CODE END 3 */
Src/stm32f4xx_it.c
/* USER CODE BEGIN Includes */
#include <stdbool.h>
/* USER CODE END Includes */
/* USER CODE BEGIN PV */
extern bool BLUELED;
extern uint32_t AD_RES_BUFFER[2];
extern uint16_t ADC1IN1,ADC1IN2;
extern float voltage1,voltage2;
/* USER CODE END PV */
void EXTI0_IRQHandler(void)
{
  /* USER CODE BEGIN EXTI0_IRQn 0 */
  // Toggle BLUELED FLAG
  BLUELED = !BLUELED;
  /* USER CODE END EXTI0_IRQn 0 */
  HAL_GPIO_EXTI_IRQHandler(User_KEY_EXTI0_Pin);
  /* USER CODE BEGIN EXTI0_IRQn 1 */

  /* USER CODE END EXTI0_IRQn 1 */
}
Inicie o ADC1 na interrupção do Timer 2:
void TIM2_IRQHandler(void)
{
  /* USER CODE BEGIN TIM2_IRQn 0 */

  /* USER CODE END TIM2_IRQn 0 */
  HAL_TIM_IRQHandler(&htim2);
  /* USER CODE BEGIN TIM2_IRQn 1 */
  HAL_ADC_Start_DMA(&hadc1, AD_RES_BUFFER, 2);
  /* USER CODE END TIM2_IRQn 1 */
}
HAL_ADC_ConvCpltCallback()é uma função de alto nível fornecida pela ST (STMicroelectronics) para facilitar a vida do desenvolvedor. Ela é chamada automaticamente quando uma conversão ADC é concluída e os dados estão prontos para serem processados. O uso dessa função é recomendado porque ela abstrai a complexidade de lidar diretamente com as interrupções de ADC e o gerenciamento de buffers, permitindo que o desenvolvedor se concentre na lógica de aplicação em vez de detalhes de baixo nível.
/* USER CODE BEGIN 1 */
void HAL_ADC_ConvCpltCallback(ADC_HandleTypeDef* hadc)
{
  // Conversion Complete & DMA Transfer Complete As Well
  ADC1IN1 = AD_RES_BUFFER[0];
  ADC1IN2 = AD_RES_BUFFER[1];
  voltage1 = (ADC1IN1 * 3.3) / 4095;
  voltage2 = (ADC1IN2 * 3.3) / 4095;
  TIM2->CCR1 = ADC1IN1;  // PWM CH1 duty cycle update based on ADC1IN1
}
/* USER CODE END 1 */
SQLite
- https://sqlite.org/
- https://inloop.github.io/sqlite-viewer/
- https://flows.nodered.org/node/node-red-node-sqlite
- https://databaseschool.com/series/high-performance-sqlite/videos/1
CREATE TABLE IF NOT EXISTS sensor_data (
    id INTEGER PRIMARY KEY AUTOINCREMENT,
    timestamp DATETIME DEFAULT CURRENT_TIMESTAMP,
    ADC1IN1 INTEGER,
    voltage1 REAL,
    ADC1IN2 INTEGER,
    voltage2 REAL,
    BLUELED INTEGER
);
let ADC1IN1 = Math.floor(Math.random() * 4096);
let ADC1IN2 = Math.floor(Math.random() * 4096);
let voltage1 = (ADC1IN1 * 3.3) / 4095;
let voltage2 = (ADC1IN2 * 3.3) / 4095;
let BLUELED = Math.round(Math.random());

// Create the SQL Insert Statement
// Replace 'sensor_data' with your actual table name
msg.topic = `INSERT INTO sensor_data (ADC1IN1, voltage1, ADC1IN2, voltage2, BLUELED)
             VALUES (${ADC1IN1}, ${voltage1}, ${ADC1IN2}, ${voltage2}, ${BLUELED});`;

return msg;
The SQL Query
SELECT * FROM sensor_data ORDER BY timestamp DESC LIMIT 1;
SQLite always returns data as an Array of Objects, even if there is only one result.
// Check if data actually exists to avoid errors
if (msg.payload.length > 0) {
  // Take the first element of the array
  // msg.payload = msg.payload[0];
  msg.payload = msg.payload[0].voltage1;
  return msg;
}
SQLite to insert data into the database
const d = msg.payload;

// Constructing the query with rounded voltage values
msg.topic = `INSERT INTO sensor_readings (ADC1IN1, ADC1IN2, BLUELED, voltage1, voltage2)
             VALUES (${d.ADC1IN1}, ${d.ADC1IN2}, ${d.BLUELED}, ${d.voltage1.toFixed(2)}, ${d.voltage2.toFixed(2)});`;

// Ensure payload is an empty array so the SQLite node executes the topic string
msg.payload = [];

return msg;
Create DB
CREATE TABLE IF NOT EXISTS sensor_readings (
    id INTEGER PRIMARY KEY AUTOINCREMENT,
    ADC1IN1 INTEGER,
    ADC1IN2 INTEGER,
    BLUELED INTEGER,
    voltage1 REAL,
    voltage2 REAL,
    timestamp DATETIME DEFAULT CURRENT_TIMESTAMP
);
Versão simplificada sem as colunas de tensão:
const d = msg.payload;

// Constructing the query with rounded voltage values
msg.topic = `INSERT INTO sensor_readings (ADC1IN1, ADC1IN2, BLUELED)
             VALUES (${d.ADC1IN1}, ${d.ADC1IN2}, ${d.BLUELED});`;

// Ensure payload is an empty array so the SQLite node executes the topic string
msg.payload = [];

return msg;
Create DB
CREATE TABLE IF NOT EXISTS sensor_readings (
    id INTEGER PRIMARY KEY AUTOINCREMENT,
    ADC1IN1 INTEGER,
    ADC1IN2 INTEGER,
    BLUELED INTEGER,
    timestamp DATETIME DEFAULT CURRENT_TIMESTAMP
);
Calculation Node (Function after the SQLite node):
msg.topic = "SELECT ADC1IN1 FROM sensor_readings ORDER BY id DESC LIMIT 1;";
return msg;
if (msg.payload.length > 0) {
  let adc_1 = msg.payload[0].ADC1IN1;

  // Perform the conversion
  let voltage1 = (adc_1 * 3.3) / 4095;

  // Return the result rounded to 2 decimal places
  msg.payload = voltage1.toFixed(2);

  return msg;
}
Or:
// The math: (adc1 * 3.3) / 4095
msg.topic =
  "SELECT (ADC1IN1 * 3.3 / 4095) AS voltage1 FROM sensor_readings ORDER BY id DESC LIMIT 1;";
return msg;
Average of the Last "X" Records
msg.topic = `SELECT AVG(ADC1IN1) AS mean_adc1
             FROM (SELECT ADC1IN1 FROM sensor_readings ORDER BY id DESC LIMIT 5);`;
return msg;
InfluxDB Test
let adc1Value = Math.floor(Math.random() * 4096);
let adc2Value = Math.floor(Math.random() * 4096);

msg.topic = "InfluxData";
msg.payload = {
  ADC1IN1: adc1Value,
  voltage1: (adc1Value * 3.3) / 4095,
  ADC1IN2: adc2Value,
  voltage2: (adc2Value * 3.3) / 4095,
  BLUELED: Math.round(Math.random()),
};
return msg;
Ou sugerido peo Gemini:
// Generate raw values
const adc1 = Math.floor(Math.random() * 4096);
const adc2 = Math.floor(Math.random() * 4096);

// Helper to convert ADC to Voltage
const toVolts = (val) => parseFloat(((val * 3.3) / 4095).toFixed(3));

msg.topic = "sensor_data"; // Useful for organizing in Node-RED
msg.payload = {
  ADC1IN1: adc1,
  voltage1: toVolts(adc1),
  ADC1IN2: adc2,
  voltage2: toVolts(adc2),
  BLUELED: Math.random() > 0.5 ? 1 : 0,
};

return msg;
VS Code Terminal Configuration
Configure Git Bash como terminal integrado do Visual Studio Code para evitar problemas de formatação de texto e comandos:
"terminal.integrated.defaultProfile.windows": "Git Bash",
Crie um gh alias para deploy-debug
gh alias set deploy-debug 'tag="$1"; cp ./build/Debug/*.elf ./firmware-debug.elf && gh release create "$tag" ./firmware-debug.elf --generate-notes && rm ./firmware-debug.elf' --shell
Como funciona:
- Considera a etiqueta de lançamento como $1.
- Copia o ELF de ./build/Debug/*.elf → ./firmware-debug.elf.
- Executa gh release create com o arquivo renomeado.
- Limpa removendo o arquivo renomeado temporário.
Uso:
gh deploy-debug v1.0.0
Rápida verificação do upload
Assim que o comando terminar, você poderá verificar o upload diretamente em seu terminal usando:
gh release view v1.0.0 --web